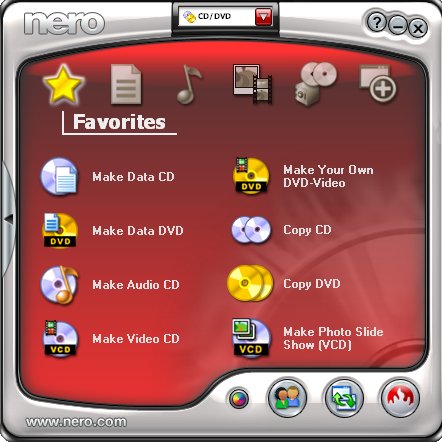
Nero is a popular product by Nero AG to mainly help burn discs like CD and DVD with the functions including:
Such software gains the most popularity in Germany. In the middle of the setup process, Nero registers itself to Windows by creating its registry entries into the auto-startup section so as to automatically run at moment Windows boots. After a successful installation, there are approximately 159 files generated, which would take up about 1.7 MB of the computer resource. To keep itself running in the background all the time, Nero’s scheduled task will be added to Windows Task Manager. The program will also add its context menu to Windows Explorer to ensure a quick access.
According to some resource, Nero’s recommended installation brings third-party program like ask.com toolbar, which appears to be abundant to many PC users and difficult to be uninstalled as well. Apart from this; some PC users want to uninstall Nero out of other reasons: some consider it is no longer useful, some just want to uninstall Nero so as to reinstall it again because of the failure in its installation. Whatever the reason is, there have been some PC users asked how to uninstall Nero and how to overcome the fatal error “Please reinstall the product” during the process.
What’s worthy of your attention is that Nero needs to be uninstalled completely without any leftover. Otherwise, reinstallation of the program will not be successful and the fragments thereof will make adverse influence on the overall computer performance. Since Nero is not a malware that anti-virus programs or other security utilities deal with, one should manually uninstall Nero. Hereinafter are several ways to offer. If you are not able to find certain file provided below or you are not that technically sound to make modifications in database, it is advisable to get one-to-one instruction from VilmaTech Online Support here by starting a live chat.

Before the uninstall, one should end its running process so as to avoid error messages.
Step 1. Hold and press Ctrl, Alt and delete key together to bring up Task Manager.

Step 2. Select the running process of Nero before hitting the “End Process” button.
Uninstall Nero from Control Panel.
Step 1. Hit Start menu and select Control Panel (If you run Windows 8, please move your mouse to bottom-right corner of your desktop, choose ‘Control Panel’ when a sidebar appears).
Step 2. Select Programs or Add/ Remove Programs (for Windows 8 owners, you should select “Programs and Features”).
Step 3. Choose Nero.
Step 4. Hit the ‘Uninstall’ button on the top of the list or right click on the selected to tap ‘Uninstall’.
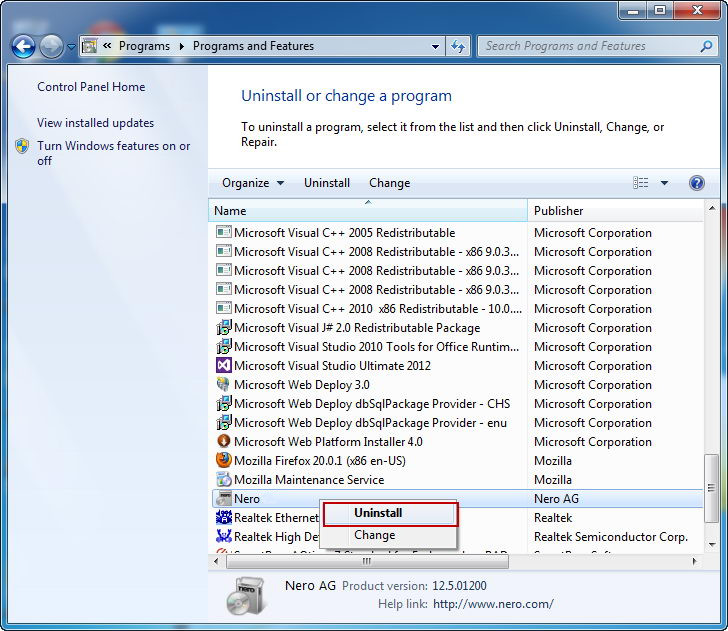
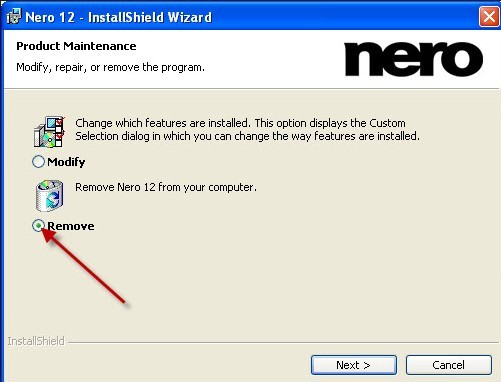
Step 5. Follow the uninstall wizard to uninstall Nero.
Uninstall Nero with its own widget.
Step 1. Right click on Nero’s icon.
Step 2. Select ‘Properties’.
Step 3. Under the ‘Shortcut’ tab, select ‘Open File Location’.
Step 4. Tick ‘Remove’ and hit ‘Next’.
Step 5. Choose ‘Yes’ to allow Nero uninstall itself automatically.
Uninstall Nero with its own uninstall tool
Step 1. Download Nero’s General Clean tool.
Step 2. Run Nero’s General Clean tool.
Step 3. Follow the on-screen instruction to allow the uninstall wizard to finish its process.
Uninstall Nero from database.
Step 1. Hover your mouse over the lower part of the Start screen (if you run Windows 7/Vista/XP, you cam simply hold and press Win key and R key together).
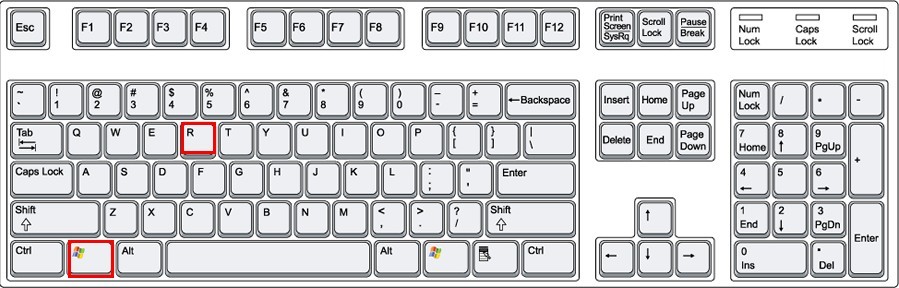
Step 2. Type ‘regedit’/‘regedit.exe’ in the Search charm bar to bring up registry editor.
Step 3. Hold Ctrl and F key together to bring up ‘find’ box.
Step 4. Copy the below keys and values to the find box and hit “Find” button to remove them:
HKEY_LOCAL_MACHINE\SOFTWARE\Microsoft\ Windows\CurrentVersion\Explorer\ NBShell.dll\{100BD527-7304-4b7f-BEE2-26D97B04EBA4}
HKEY_LOCAL_MACHINE\SOFTWARE\Microsoft\ Windows\CurrentVersion\Explorer\ NBHShx.dll\{8D2223A2-B3C6-4e32-B096-CDD11F628C60}
HKEY_LOCAL_MACHINE\SOFTWARE\Microsoft\ Windows\CurrentVersion\Explorer\ InCDshx.dll\{09bffb91-ecda-4149-bcfd-d87a345c219e}
Attention:
Though the above steps for Nero uninstall from database have been tested to be applicable to most cases, they are not universal solution to Nero uninstall from database as different version of Windows has different components. Thus the location of Nero can be different. However, one can still utilize third-party programs to help with the uninstall. If one encounters error message after ending its running process, it is better to commence the uninstall from database as the error message is indicating some modifications by Nero are still there in the kernel part of a machine. To completely uninstall Nero is necessary whether it is for another reinstall or the better computer performance. Should there be any troubles during the uninstall overwhelm you, you are always welcome to get real-time help from professionals from VilmaTech Online Support.