It has been widely heard that Ukash virus locks down computers & Android devices and asks for a fine that can be up to 300 US Dollars/ Euro/ CAD/ AUD for laws infringement on watching pornography, download copyrighted materials, spreading terrorism and the like. Ukash virus is what we call ransomware, which mainly stays active in western countries, that invades into a computer & Android system with Trojan to acquire victim’s IP address, system language, and the access to build-in camera before displaying a counterfeit law-breaking message entitled the governmental department accordingly. Ukash virus is not a specific virus, instead, it is used in a general sense. We made the word ‘Ukash virus’ simply because such payment method is commonly adopted by cyber criminal to collect the non-existent fine. Herein, we put some famous version of Ukash virus to have wide range of PC and Android users to look at due to the limit space:

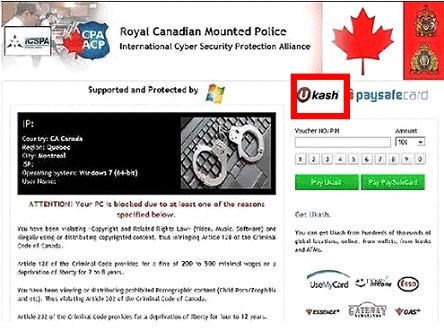
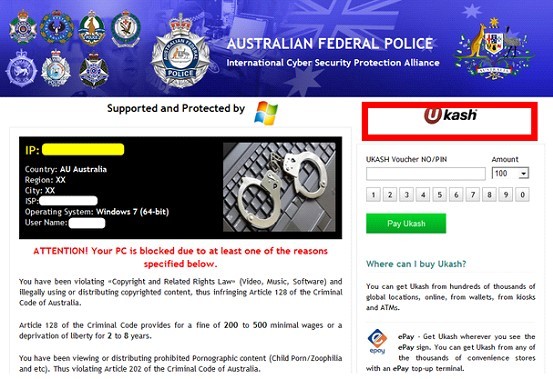
★Australian Federal Police virus
Ukash is an e-commerce form of currency that allows Internet users to exchange money for Ukash code that can be used to make purchase online. It has developed to a secure payment method that delivers voucher with unique 19-digit code, value, currency and expiry date.

Thus has gained good reputation and become popular, it is even available from ATMS. However, it has been utilized for fraudulent activities. Being a prepaid payment method where vouchers are guaranteed and payment assured, there’s no charge-backs or repudiation, which results in the tragedy that victims cannot retrieve the money back in the case of a fraudulent purchase, though Ukash claims to be regulated by the Financial Contact Authority and subject to ongoing and highly strict fraud monitoring.

At present, Ukash virus has plagued many PC users with the technique based on that in Eastern Europe countries. By exploiting the most popular payment method Ukash, quoting legal terms, hijacking camera and IP address and filching the image of political figures, flag and national emblem, cyber criminals behind Ukash virus manage not only to cheat law-abiding citizens into submitting large amount of money willingly, but also to escape being prosecuted to some extent. To complete such perfect scam, cyber criminals are known to attack computers by adopting DDOS (Distributed Denial of Service) to make them puppet machines so as to control them to attack others. By doing so, it is difficult to track down criminals. As computers are connected with World Wide Web, criminals obtain chances to spread their crafts by exploiting vulnerability on server, web sites, installed programs, etc. with the help of Trojan which hammers at hiding viral items from being detected. Thanks to the Rootkit technique from Trojan, Ukash virus is capable of putting its source files into an encrypted folder before its eradication of the source ones and fabricating false ones in a bid to direct installed security utilities in a wrong way to escape easy deletion. Ukash virus then affects database to acquire information so as to form the counterfeit but vivid security warning sealed-screen message accordingly. Apparently that Ukash virus is able to impose modifications randomly, leading to dysfunctions like:
★ Disabled Safe Mode, it can be Safe Mode with Networking, Safe Mode with Command Prompt.
★ Useless System Restore and System Repair.
★ White screen or blue screen happens.
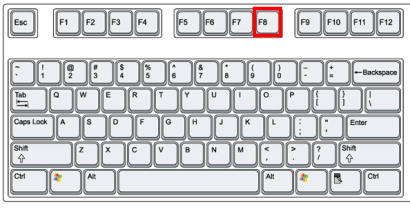
★ F8 key will not direct victims into ‘Advanced Windows Options’.
★ Beep happens when constantly tapping on F8 key when trying to troubleshoot the problem with ‘Advanced Windows Options’.
What’s worse, backdoor can come into shape because of the Trojan. Arbitrary modifications made deep in a target system can aggravate the risk of being attacked by other virus, resulting in residual damages to the computer:
★ Computer takes longer to response to tasks.
★ New tab will open up automatically during browsing session and direct to some vicious sites, including commercial ones.
★ CPU is usually consumed highly when few programs are running in the background.
★ It takes longer to load a page.
★ Search results unrelated to queries are often obtained.
★ Crashes and freezes could happen with additional unknown icons on desktop.
If your anti-virus programs expire, you are not able to run rescue disk because of Ukash virus’ blocking screen or security utilities help only to remove innocuous infections, you are highly suggested to employ manual method to remove Ukash virus before it alleviates additional installations of other virus and further affect other functional forms of mode.
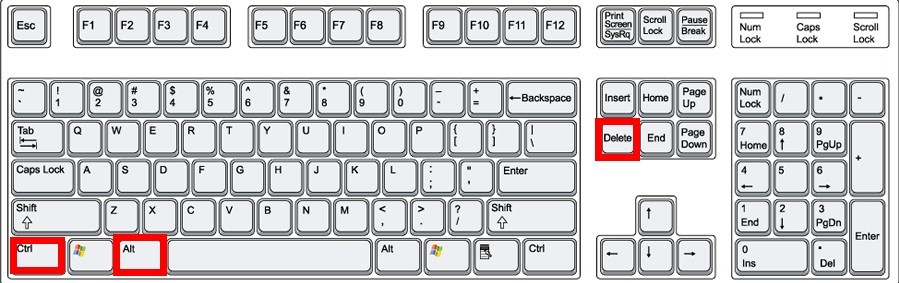
ⅠBoot into Safe Mode with Networking by restarting the computer or by cold restart.
★Windows 8 users to follow up
★Windows 7/XP/Vista users to follow up
ⅡDisable startup items associated with Ukash virus.
★Windows 8 users to follow up

★Windows 7/XP/Vista users to follow up
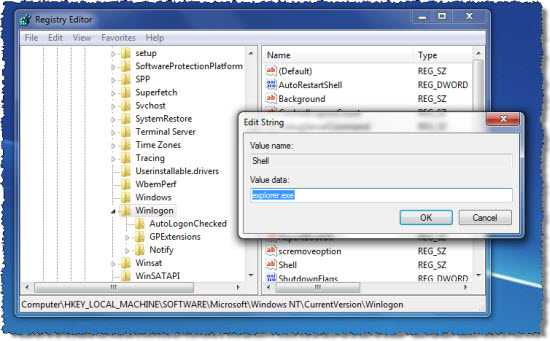
ⅢRe-manage Database (registry editor).
★Windows 8 users to follow up
★Windows 7/XP/Vista users to follow up
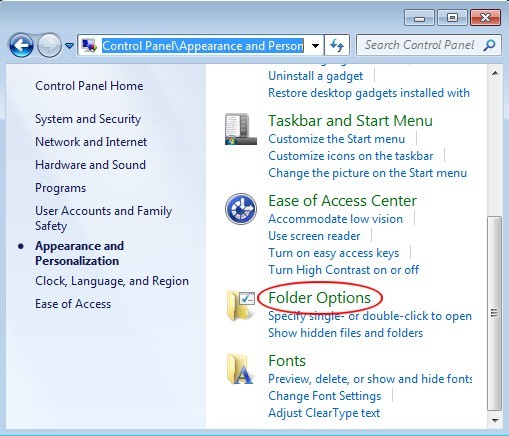
ⅣShow hidden files to remove Ukash virus.
★Windows 8 users to follow up
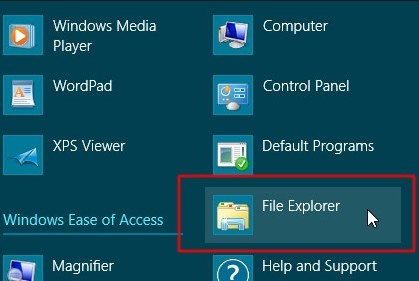
★Windows 7/XP/Vista users to follow up
Save changes, reboot to normal mode to see if Ukash virus is gone.
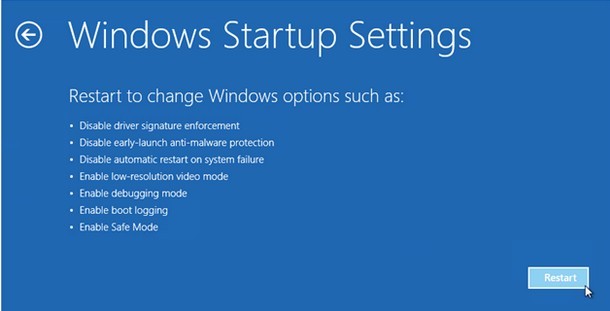
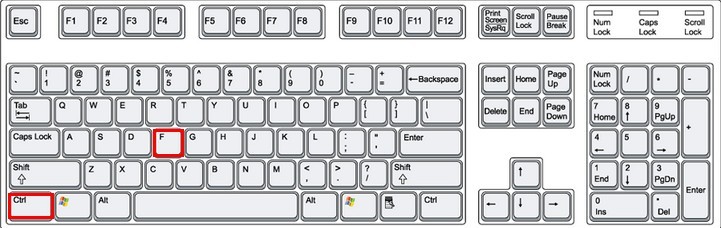
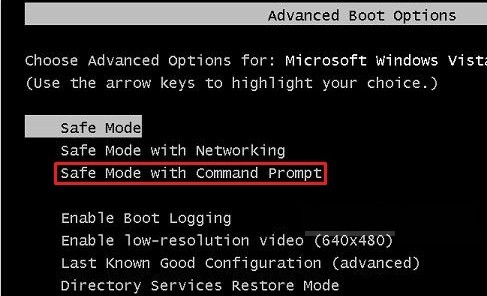
ⅠEnter into Safe Mode with Command Prompt.
★Windows 8 users to follow up
![]()
★Windows 7/XP/Vista users to follow up
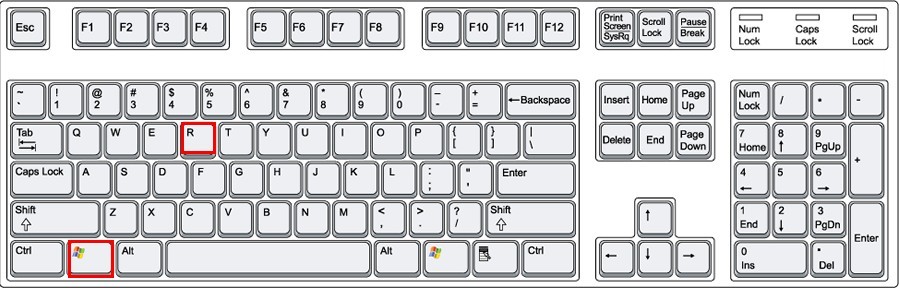
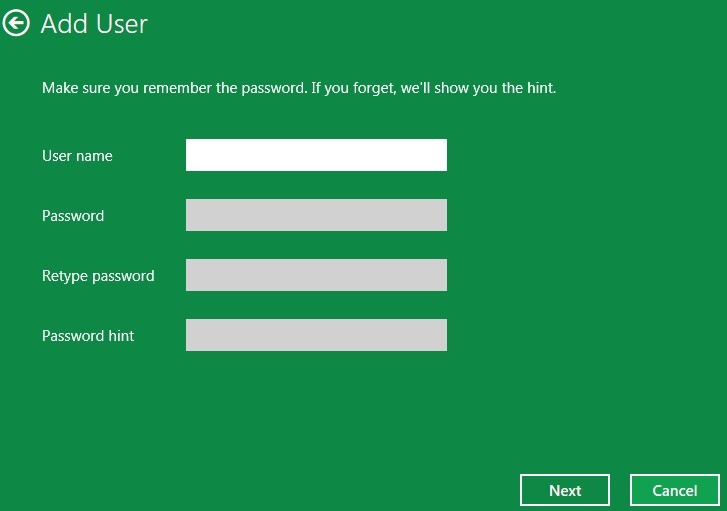
ⅡCreate a new user account with administrator from cmd.
★ create a new user account on Windows 7
★ create a new user account on Windows XP
★ create a new user account on Windows Vista.
★ create a new user account on Windows 8
> If Windows Live id is available, use it to create a new account
> Otherwise, click on ‘More about logon options’ to fill in the given form, then follow the on-screen hint to finish creating a user account.
ⅢRemove Ukash virus in the newly created user account.
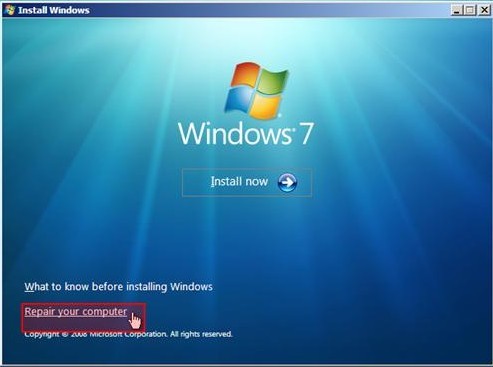
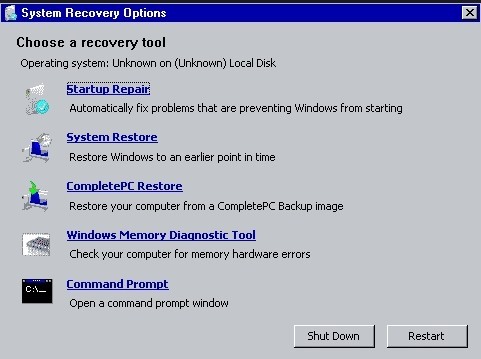
ⅠReboot your computer and access ‘Repair Your PC’.
★ Windows XP users to follow up
★ Windows 7 users to follow up
★ Windows Vista users to follow up
★ Windows 8 users to follow up
★ Do not visit some unsafe websites especially viewing pornographic video on unreliable source.
★ Do not open unknown or spam email, which is possibly exploited by Ukash virus; otherwise, Ukash virus will infiltrate system quickly.
★ Be cautious about pop-up ads and coupons when you search online; it is usually a trick to cheat your money or gain illegal profit.
★ Do not download free programs on unofficial website; if you need one, it is recommended to visit official website and get the program you want.
★ Install at least one and two at most advanced anti-virus program on your computer; regular full scan is required to detect suspicious objects in order to prevent your PC from potential infections.
★ Clean out junk files, cookies, and potentially vicious add-ons, which helps to make sure your PC is healthily running.
Keep the aforementioned tips in mind, and you are able to avert malicious virus from invading into your system.
Conclusion:
Ukash virus should be removed from the infected PC and Android platform as soon as possible once you have found it. For the virus can not only lock down your PC or Android Phone to damage the system but also steal personal /confidential data like online account, password, and some privacies of Credit Card, if any. Should you believe Ukash virus over online professionals to submit the stipulated amount of money, you are not merely suffering from economic losses, you also make the cyber cribbers taste the sweetness of illegal activities. To crown it all, don’t be reluctant to remove Ukash virus when some forms of Safe Mode or another user accounts are functioning well since the Trojan will help Ukash virus to spread its infectious code to those places. In a word, you should remove Ukash Android virus at first time. And it is worth the reiteration that the truth is there isn’t such thing as computer being locked by police for watching child porn and similar stuff. This behavior is totally conducted by cyber criminals. One won’t need to worry about any criminal cases initiated against self. All we need to do is to remove Ukash Android malware in a bid to regain a functional machine.
As tricky Ukash Android virus always infected the targeted computer and Android system with a variety of methods, users have to learn to prevent its infection better than dealing with it. Mostly, cunning virus would love to be bundled with other software installation packages, especially for those third-party software or media software. This kind of bundled programs were usually derived from corrupted resource station set up by the cybercriminals. And most of the innocent users downloaded such software without knowing it was safe or not, what’s worse, they always forgot to detect the new downloads before using or installing them. In this way, dangerous virus or malware would have the chance to infect the targeted computer arbitrarily. Sometimes, Ukash Android virus would also be disguised as a system prompt showing suddenly to notice the users that some system applications need to be upgraded now, asking them to approve the update request so that the malicious virus could be launched immediately. Because most of the PC/Android users are not familiar with their computer, not to mention various updates of system file and applications. So, they often gave their permission blindly and thoughtlessly, letting tricky Android virus have the opportunity to take advantage of. Just as virus and malware are full of cunning tricks, users have to learn a lesson from them and against with them gamely in the future.