The birth of ZeroAccess virus can be traced back to the year of 2009 when the first ZeroAccess was found in the Internet world amid the epidemic of MBR rootkit and TDL2 rootkit. TDL2 rootkit was the most advanced kernel-mode rootkit until an uncharted rootkit was accidentally found by security researchers. The uncharted rootkit, which is later known as ZeroAccess, was capable of disabling most of the security utilities that managed to scan specific folders back then. The rootkit created a new kernel device object named __max+> to help itself become notorious in the Internet security world. After studies on ZeroAccess virus, it had been found that the rootkit would put its codes into two spare data streams win32k.sys:1 and win32k.sys:2. To escape detection, ZeroAccess would disable any security utility that attempted to scan the two streams. Besides, it would create some counterfeit directories by adopting NTFS technique in a bid to take users as well as security utilities to the phony rootkit device. From then on, ZeroAccess virus began its ceaseless development to change the infection way, making itself more progressive and aggressive.
ZeroAccess virus installs itself onto a computer by exploiting warez sites and vulnerability to find carriers. In other word, drive-by download is the dissemination routine that ZeroAccess commonly uses. Such rootkit has achieved series of debugging techniques to efficiently slow down the analysis progress on codes by security utilities before its infiltration so as to acquire the privileges after decompression: SeDebugPrivilege, SeTakeOwnershipPrivilege, SeRestorePrivilege, SeSystemtimePrivilege and SeSecurityPrivilege. By doing so, ZeroAccess would become capable of collecting information without being interrupted.

When in, ZeroAccess virus enumerates all system drivers by using ZwQuerySystemInformation function through SystemModuleInformation to randomly pick up a driver between classpnp.sys and WIN32K.SYS under systemroot\ System32\ Drivers to overwrite the original code which is used for backup. In the process of loading payloads, ZeroAccess produces its registry entries containing an ImagePath \ * under HKLM\SYSTEM\CurrentControlSet \Services\, which enables ZeroAccess to avoid the disturbance from security utilities when its loading more payloads, since \ * is considered not to direct to any practical file. As a matter of fact, it is the symbolic link set up by calling ZwCreateSymbolicLinkObject function to lead to its practicle files. Simultaneously, ZeroAccess virus breaks system File Associations by modifying the .exe and exefile value under HKEY_CLASSES_ROOT, run value and creating windowfile value to direct the open link of .exe file to %SYSTEMEXERT%.exe, the virus program ZeroAccess generates. After that, ZeroAccess learns payloads to generate a hidden disk object that is used to store files and data driver, which is pretty much like the infiltration method adopted by TDL3. To prevent the visit by operating system, ZeroAccess virus sets up a brand new way to encrypt the hidden volume.
After all the advanced techniques to guarantee a secure settlement on a target computer, ZeroAccess may send bogus message to the user, telling that the computer has virus and that the user needs to download or purchase the anti-virus program displayed in the message with a link embedded. In effect, the recommended anti-virus program is an updating program of ZeroAccess made by the virus maker. Or sometimes, ZeroAccess may not bother doing so. With its malicious registry entries implanted into the kernel part of a system, a backdoor is formed to serve the task of loading down more codes and commands from its remote server and uploading what has been done successfully. What’s worse, such backdoor can also alleviate the installations of other types of virus.
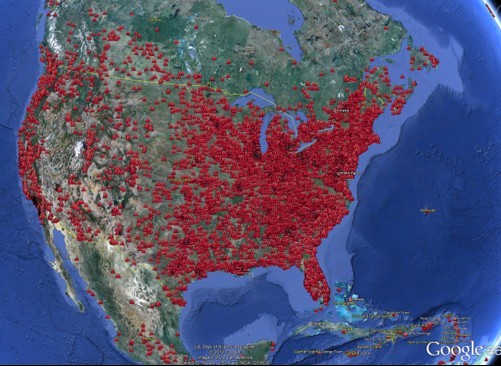
According to the security researchers, there have been more than nine million computers affected with ZeroAccess Rootkit virus which mainly brisks up in United States.
It has been reported that ZeroAccess virus cannot even be removed by reputable anti-virus programs and that it prevents victims from unveiling hidden items with build-in functions. What’s worse, to manually remove flagged items of ZeroAccess will encounter error messages. There can be other dysfunctions as listed below:
※ System repair cannot complete itself.
※ Updates on Windows and firewall are disabled.
※ Double click on disks will not open them; only by right clicking on an item and selecting “Open” will the item unfold.
※ Almost all anti-virus programs, anti-spyware programs and system management tools can not be launched properly.
※ The current active windows containing words like “remove virus”, “security” and “community” will be closed by ZeroAccess rootkit virus.
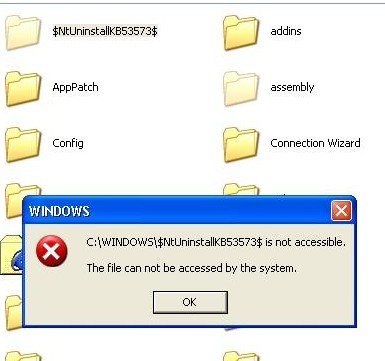
Obviously, ZeroAccess virus has modified configurations in sections like %systemroot%. By creating a folder in the directory resembling ‘c:\windows\$NtUninstallKB35373$’ (the last five digits is specific to the victim’s computer) under ‘%systemroot%’ to store files encrypted by a modified version of RC4, and making the folder inaccessible to programs with standard Windows APIs, ZeroAccess virus is able to disable programs to pop up error messages.
And ZeroAccess virus has also made modifications to database. All these do not mean to irritate victims. Rather, it is doing these to protect itself from being removed easily. Random and arbitrary modifications in kernel part of a system can not only disable build-in services, but also give a chance to additional virus for achieving infiltration. It is worthy the mentioning herein that ZeroAccess virus is widely used to help other kinds of virus to cover up their traces. Therefore, victims of ZeroAccess virus may encounter the following mess overtime:
※ Unknown programs are installed
※ Search redirect problems increase in frequency.
※ Threat alerts reports more Trojans and error issues.
※ Countless popup ads from different sites are detected.
※ New tab will open up automatically from time to time.
※ It takes longer for the compromised computer to respond.
※ Browsers (e.g. IE, Mozilla Firefox, Google Chrome) would crash from time to time.
※ CPU usage acts weirdly, sometime would soar steeply high when few programs are running in the background.
Not all victims will encounter all the above listed dysfunctions. The damage and dysfunctions depend on the backdoor by ZeroAccess. The longer ZeroAccess virus stays on a system, the more vicious payloads are downloaded. Therefore, it is an emergency to remove ZeroAccess rootkit virus with an efficient method.
Step ⅠRun full scan with reputable anti-virus program again, try to remove any possible items generated by ZeroAccess.
Step ⅡShow hidden files and folders, regardless of the possibility that such build-in service has been disabled by ZeroAccess.
> Start screen.
> Open any folder.
> Open Windows Explorer.
> Select View tab.
> Tick ‘File name extensions’ and ‘Hidden items’ options.
→ mainly navigate to C:\windows\winstart.bat, C:\windows\wininit.ini and C:\windows\Autoexec.bat to find and delete every files and folders named after ZeroAccess and the ones with a string of numbers and letters.

> Click open ‘Control Panel’
> Search for ‘Folder Options’
> Tap View tab
> Tick ‘Show hidden files and folders and non-tick Hide protected operating system files (Recommended)’
> Press ‘OK’
→ mainly navigate to C:\windows\winstart.bat, C:\windows\wininit.ini and C:\windows\Autoexec.bat to find and delete every files and folders named after ZeroAccess and the ones with a string of numbers and letters.
Step Ⅲ Remove suspicious files and folders to help remove ZeroAccess.
▲ Remove items under Root directory to step forward to remove ZeroAccess successfully.
> Navigate to Root directory under C Disk, remove any item that is not familiar to you and is created on the day ZeroAccess was detected.
▲ Remove files in c:\\windows to step forward to remove ZeroAccess successfully.
> Navigate to c:\\windows, remove any file created.
> Right click on the space to select ‘arrange icons by’/ ‘sort by.’
> Select ‘Day’/‘Date’/‘Modified’.
> Scroll to the bottom of c:\\windows window.
→ Remove files created on the day ZeroAccess was detected and are not seen before.
▲ Remove files in system32 folder to step forward to remove ZeroAccess successfully.
> Navigate to c:\\windows, remove any file created.
> Right click on the space to select ‘arrange icons by’/ ‘sort by.’
> Select ‘Day’/‘Date’/‘Modified’.
> Scroll to the bottom of system32 window.
→Remove files created on the day ZeroAccess was detected and are ended with weird extension, for example, ‘msconfig.com’
▲ Remove all temp folders under System32 to step forward to remove ZeroAccess successfully.
> Double click on Temp folder under System 32.
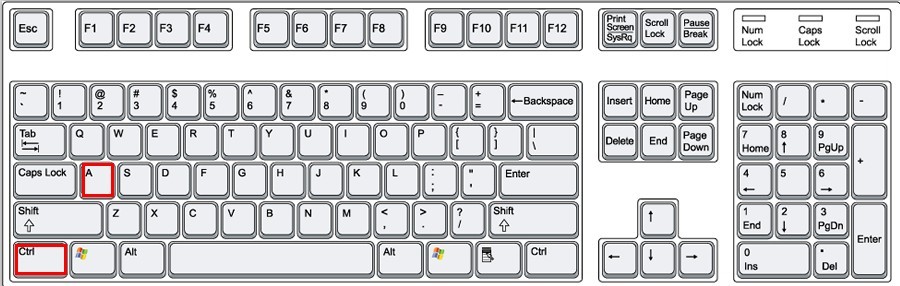
> Press Ctrl and A key together.
> Right click on one of the selected items.
> When a drop down list shows, press Shift and D key together.
> A box comes up for confirmation.
> Press Enter key.
▲ Restart the infected computer.
If error message prompts up after reboot to tell that files cannot be found, it is telling you that there still are registry keys being modified by ZeroAccess. Follow the path showed in error message to modify accordingly.
StepⅣ Exterminate related running process to remove ZeroAccess virus smootly.
Exterminate the vicious items by simply right clicking on it and selecting ‘End Process’ will trigger error message telling that the process cannot be ended. Follow the steps below to end process smoothly.
> Hold Ctrl, Alt and Delete key combination together.
> Task Manager shows.
> Hit View tab.
> Select ‘Show Kernel Times’/ ‘Select Process Page Columns’.
> Tick PID (Process Identifier).
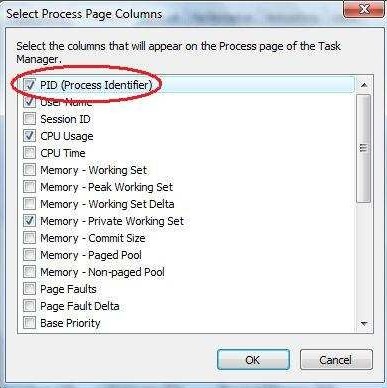
> Press OK.
> Find ‘LSASS.exe’ for its image of the User Account which does nor belong to system.
> Back to desktop and press Win key and R together.
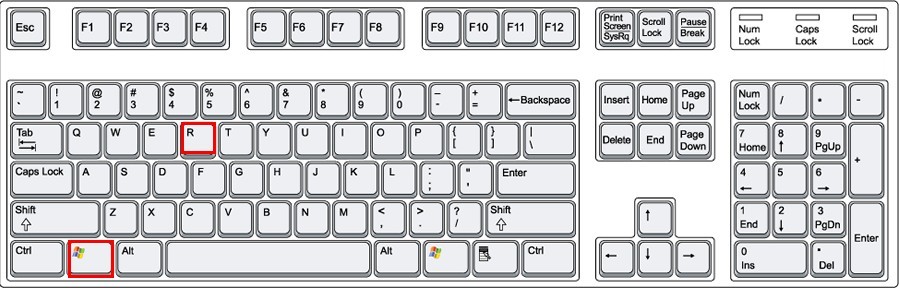
> Put in ‘CMD’ and press Enter key.
> Type ‘ntsd –c q -p (PID, the number you saw on Task Manager)’ (without quotation marks).
> Press Enter key.
> Start screen.
> Type ‘Task’.
> Task Manager shows.
→ follow the same process as depicted above.
Step Ⅴ Go to Regedit and manage database there to remove other rubbish generated there by ZeroAccess virus in a bid to avoid dysfunctions.
> Move your mouse over lower right screen.
> Charms bar appears.
> Click Search charm.

> Type ‘regedit’/‘regedit.exe’ and hit Enter key.
> Press Ctrl and F key together.
> Type ‘regedit’ and press Enter key.
> Scroll files and find regedit.exe under Windows.
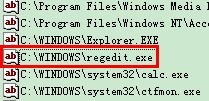
> Right click on it to click on ‘Modify’ to substitute ‘regedit.exe’ with ‘regedit.com’.
> Press Enter key.
> Delete ‘Check_Associations’ under
HKEY_CLASSES_ROOTWindowFiles
HKEY_CURRENT_USERSoftwareVB and VBA Program Settings
HKEY_CURRENT_USERSoftwareMicrosoftInternet ExplorerMain
> Delete ‘ToP’ under
HKEY_LOCAL_MACHINESOFTWAREClientsStartMenuInternetINTEXPLORE.pif
HKEY_LOCAL_MACHINESOFTWAREMicrosoftWindowsCurrentVersionRun
> Find HKEY_CLASSES_ROOTCLSID{871C5380-42A0-1069-A2EA-08002B30309D} shellOpenHomePageCommand.
> Right click on it to substitute ‘INTEXPLORE.com’ with ‘C:Program FilesInternet ExplorerIEXPLORE.EXE’and press Enter key.
> Find HKEY_CLASSES_ROOT ftpshellopencommand.
> Right click on it to substitute ‘INTEXPLORE.com’ with ‘C:Program FilesInternet Exploreriexplore.exe” %1″’and press Enter key.
> Find HKEY_CLASSES_ROOThtmlfileshellopennewcommand.
> Right click on it to substitute ‘INTEXPLORE.pif’ with ‘C:Program FilesInternet Exploreriexplore.exe” %1″’and press Enter key.
> Back to C:\WINDOWS\regedit.com that we just changed.
> Change the extension back to .exe.
> Modification in Registry Editor finishes.
> Start menu.
> Launch Run/ Search box.
> Type ‘regedit’.
> Hit Enter key.
→ follow the same process thereafter.
Step Ⅵ Repair your system to ensure that we remove ZeroAccess thoroughly.
> Insert Windows XP CD into the drive (if Autoplay kicks in, exit out of it).
> Click on Start -> Run.
> Copy and Paste ‘sfc /scannow’ within the text box.
> Windows File Protection Service scans all protected files and verifies integrity, replacing any files with which it finds a problem.
> Be patient and allow this process to proceed completely.
> Restart your computer once this process is completed.
> Put Windows 7 CD in your optical drive
> Restart to boot from the DVD.
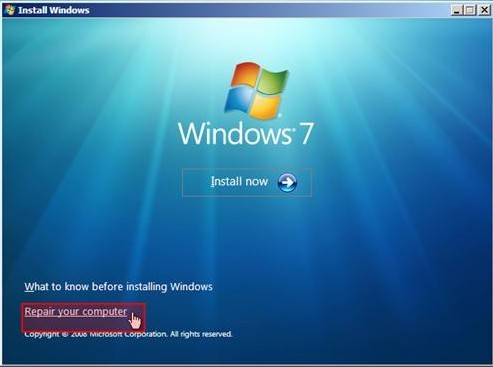
> On the “Install Windows” screen, make the appropriate selections for language, time, and keyboard, and then click “Next”.
> On the next screen, click “Repair Your Computer”.
> In “System Recovery Options”, select which operating system you want to restore if any are listed, and click “Next”.
> The “System Recovery Options” screen shows up and select “Startup Repair”.
> Start Screen.
> Type ‘Advanced’.
> Click Settings category.
> Select Advanced startup options.
> General PC Settings screen appears.
> Scroll down to the bottom to select Advanced startup.
> Press on Restart now.
> Select Troubleshoot.
> Select Advanced options.
> Click on Automatic Repair.
> Log in the User Account you wish to repair.
> Automatic repair will now start.
> After a while, your computer will automatically restart; please leave it to complete all the process.
> Insert Windows Vista DVD and restart the computer with the DVD in.
> ‘Press any key to boot from CD or DVD’ is displayed in black background.
> Press any key to start the booting process.
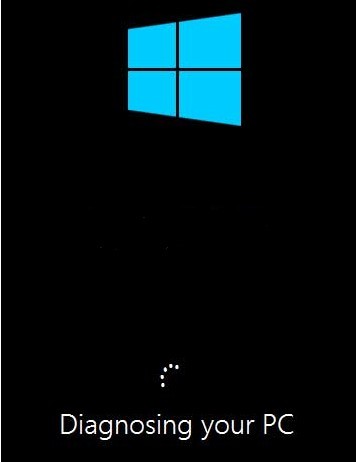
> A new screen will appear saying ‘Windows is loading files’.
> Another small progress bar appears after several minutes.
> Select your language and keyboard language and click Next button when you are given options.
> Click on the Repair Your Computer option at the bottom left of install screen.
> Once the ‘Vista installation’ is located, highlight it and then click the Next button.
> You will see the picture below:
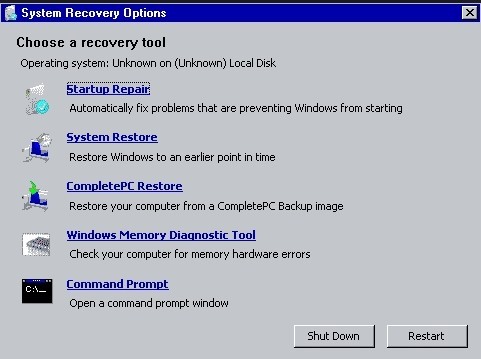
> Click on Startup Repair and let the wizard finish.
> It is perfectly normal that the computer restarts after it finishes the process.
ZeroAccess virus is a sophisticated malware produced by cyber criminals, which has the capability to make unexpected symptoms on affected machine. Most commonly ZeroAccess virus may slow down the performance of system via taking up large amounts of system resources. This may be embodied in starting up, shutting down, playing games and surfing the web. Though ZeroAccess virus is removed from computer, the problem of slow performance may exist. As a result, you can follow the recommended tips to speed up your computer after virus removal.
1. Disable unwanted start-up programs. It is certain that too many start-up programs can occupy high system resources to directly slow down the speed of shutting down and starting up. By default, you can disable unwanted start-up programs with default System Configuration option. You can follow the steps here to manually set it:
2. Clean up hard drive. Hard drive a system device which is used to store and retrieve digital information, primarily computer data. As a result, hard drive can be stored with a mass of files, including temp files, downloaded program files. Hence, you need to clean up hard drive regularly to keep the eminent operation of computer.
Tips:
It is easy for ZeroAccess virus to come back if one is not thoughtful and prudent. ZeroAccess rootkit virus can return resorting to autorun.inf and other correspondent virus programs generated in local hardware, memory stick or external hard drive with automatic playback function. There have been not a few cases where victims who formatted system partition get infected with ZeroAccess virus again shortly after they visit other disks. To remove ZeroAccess virus does not pertain to the removal on the affected computer, one should also remove ZeroAccess virus on any possible application that is once connected with the computer. In such case, it is highly recommended to adopt manual method. Though it can be difficult for PC users who know little about computers, the removal process can also be completed if one consults computer professionals here and asks them for additional details. Be aware that there is no universal solution to ZeroAccess virus since concrete situation can be different from operating system, installed programs and the modifications made by administrator/ additional virus. However, the above provided steps have been tested to help most of the cases. Should there be any failure after finishing the steps, feel free to ask for customized solution.