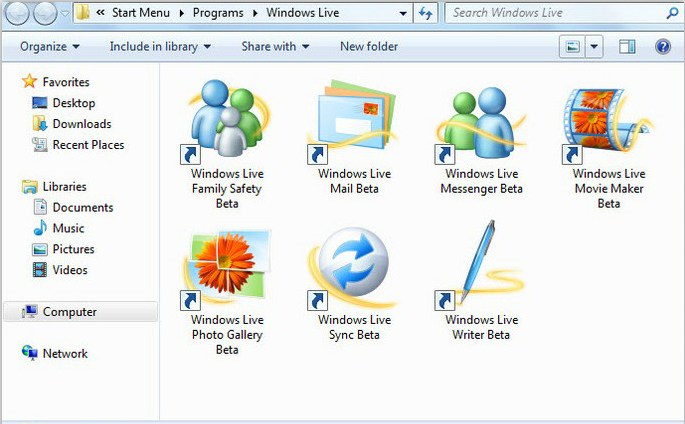
Sometimes you have to uninstall Windows Live Essentials to troubleshoot when you are trapped into compatibility problems. Windows Live Essentials is a suite of freeware applications created by Microsoft that aims to offer integrated and bundled e-mail, instant messaging, photo-sharing, blog publishing, and security services. The Windows Live Essentials Pack is available as a free download except for four major applications from previous versions of Windows like Windows Live Messenger, Windows Photo Gallery, Windows Movie Maker, and Windows Live Mail, it also along with seven new applications. Windows Essentials applications can be installed on Windows 7, Windows 8. Previous versions are also available on Windows XP, and Windows Vista.
Although the Essentials program are designed to integrate well with each other, many computer users want to uninstall Windows Live Essentials pack for they are suffering from many troubles when they are trying to update the program by the demanding of the prompt that says you need to download Windows Live Essentials to update my msn messenger and hotmail. However, the download of the target program can result in duplicating a lot of programs like windows mail and windows photo, movie maker etc. Later after that, you would have a lot of duplicates of all these so that you have to uninstall Windows Live Essentials or originals to deal with these troubles. Taking Windows Live Essentials for instance, I would like to introduce several methods on how exactly to do to uninstall Windows Live Essentials.

First method:
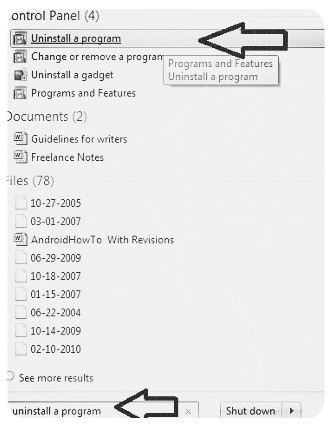
A: Click on Start menu-> Type program/ uninstall a program in search box and hit enter key-> Click on Uninstall a program from the results list.
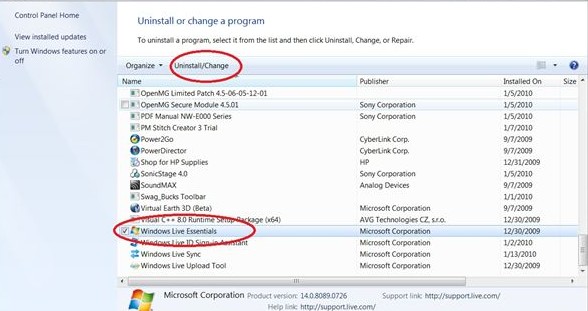
B: Locate and click on Windows Live Essentials->Click on Change/Uninstall
C: The Setup Wizard pops-up. Click “Remove” option.
D: Select “Complete uninstall” option to uninstall the software. Click on Next button
E: You will be prompted that it says please verify that you are ready to remove all components. Please click on “Remove” to proceed to the next step.
F: You will be required to reboot your computer to apply system changes and then finish the uninstall Windows Live Essentials. Please select “Yes” to immediately reboot it.
Second method: Manual way to uninstall Windows Live Essentials program.
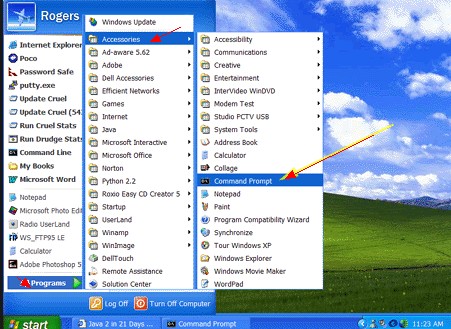
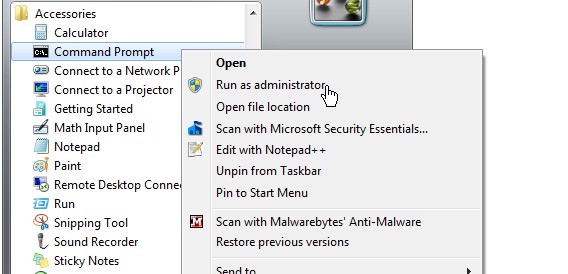
A: Click on Start button-> Click on Programs-> Click on Accessories-> Click on Command Prompt.
B: Next, right click on Command Prompt, Select run ad administrator.
C: You can type below commands into the cmd black window to uninstall Windows Live Essentials pack. Please notice any required space.
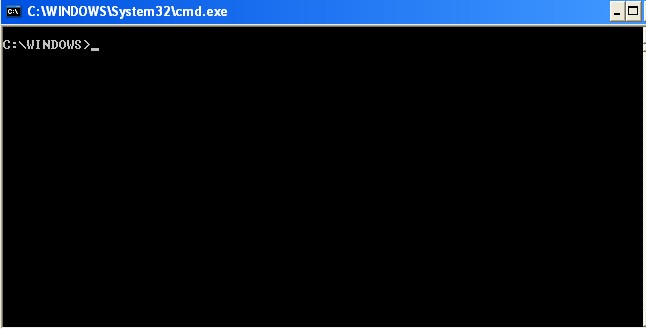
• (64-bits) “c:\program files (x86)\windows live\installer\wlarp.exe” /cleanup:all /q
• (32-bits) “c:\program files\windows live\installer\wlarp.exe” /cleanup:all /q
D: After the un-installation has been finished, it may pop-up a dialog box to prompt you.
E: Restart your computer to effect all changes.
First Method:
A: If you are using Windows XP, click the Start button and open the Control Panel.
B: Double-click Add or Remove Programs and wait for the list of currently installed programs to be populated.
C: Click on Windows Live Essentials and click the Change/Remove button.
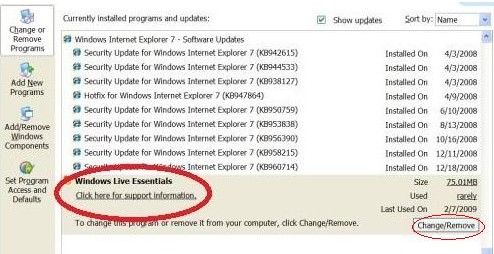
D: Follow the required wizard to uninstall the target program like the steps mentioned above.
Second method: Manual way
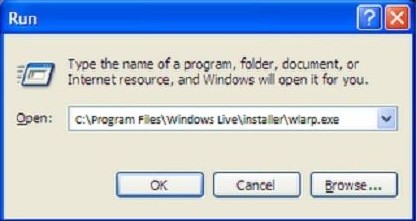
A: Click on the Start button-> Click on Run
B: In the Run dialog box, enter C:\Program Files\Windows Live\installer\wlarp.exe then press Enter key.
C: Next screen with prompting message asks you whether you want to uninstall Windows Live Essentials, you need click uninstall.
D: Select the Windows Live programs that you want to remove and click Continue.
Click close after the un-installation has been finished.
E: Restart your computer.
First method:
A: San your mouse from right edge to the middle of light and then click Search box.
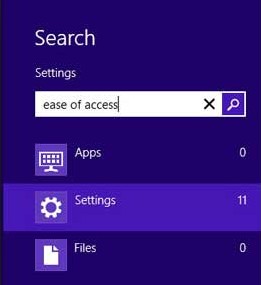
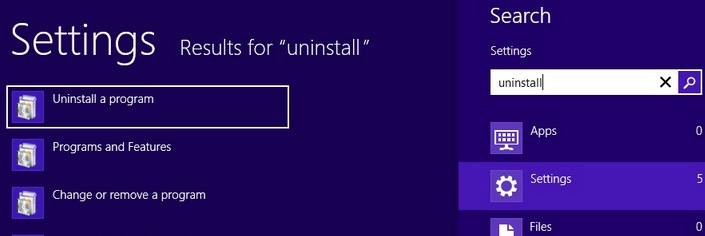
B: Type “uninstall” in Search box and then click on Settings.
C: Click on Uninstall a program
D: Click on Windows Live Essentials pack, click Uninstall/Change-> Continue-> If it is needed, type in the required password.
E: Follow the demanding of un-installation process to get the removal finished.
Second method: Manual way on Windows Live Essentials removal
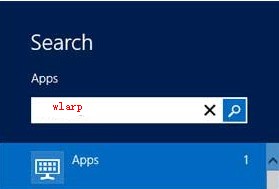
A: Open Search box
B: Type wlarp in Search box and click on Apps.
C: Click on wlarp, select “Remove a program”.
D: Select on Windows Live Essentials and click Uninstall.
E: The left steps are same as above.
Besides all steps mentioned above, additionally, one more significantly essential step needed to do to completely uninstall Windows Live Essentials is to clear out all leftovers including its left files and registry entries. To do like so you can maintain your computer performance mainly aiming at averting from duplication fragments.
A: Open local disk where the Windows Live programs installed. Locate its folders and delete them.
C:\Program Files\Windows Live Essentials (64 bits)
C:\Document and Settings\All Users\Application Data\)
C:\Documents and Settings\%USER%\Application Data\ Windows Live Essentials (64 bits)
B: Open Registry Editor. By typing “regedit” in search box or Run window and pressing enter key to reveal Registry Editor.
C: Highlight My Computer and find below registry entries as follow and delete them.
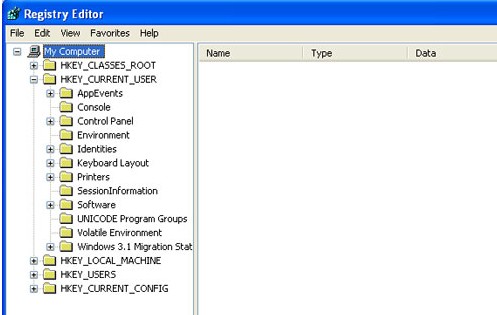
HKEY_LOCAL_MACHINE\Software\Windows Live Essentials (64 bits)
HKEY_LOCAL_MACHINE\Software\Microsoft\Windows\CurrentVersion\Run\eg ui
If you have tried each of the above steps to remove Windows Live programs but no avail, you can contact with VilmaTech Online Support that they may offer you more pertinence suggestions to uninstall Windows Live Essentials or other Third-Party Windows programs.